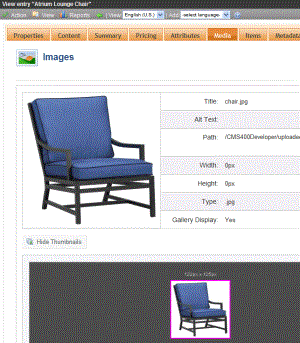
Product Types
Create a separate product type definition for each category of catalog entries that you sell. For example, you might have a product type for movies, another for books, a third for electronics, etc.
When thinking about creating new product types, the most significant differences are the Class field (described below) and the content page, which defines the XML Smart Form for products you will create of a Product Type.
Product Classes
A catalog entry’s product class affects site visitors’ purchasing options. Classes are explained below.
|
Class |
Description |
Example |
|
Kit |
Let a site visitor select from any number of free-text options. Options can increase or decrease the overall price. See Also: Creating a Kit |
A computer whose price changes as a site visitor selects RAM, hard drive, monitor, etc. |
|
Bundle |
A catalog entry consisting of several other catalog entries bundled together. Its pricing, shipping, images, etc. are independent of the individual items. See Also: Creating a Bundle |
A living room set: couch, end tables and lamps. Instead of buying each item separately, the site visitor buys all for a “package” price. |
|
Product |
Simple or complex catalog entries. A complex product is a “wrapper” that provides links to related simple products. Each simple product has its own SKU, price, inventory data, etc. See Also: Creating a Complex Product |
A movie in three formats and prices: VHS ($12.95) DVD ($14.95) Blu-ray ($17.95) |
|
Subscription |
A catalog entry which can provide access to designated site pages, and may billed on a recurring basis. See Also: Creating a Subscription |
Web site content that is only available to subscribed members |
How Product Types Affect the Creation of Catalog Entries
Catalog folders generally contain the same kind of catalog entries, such as DVDs or digital cameras. Some information applied to a catalog folder is inherited by all entries in the folder.
After you create product types, apply appropriate ones to catalog folders using the Catalog Properties screen’s Product Types tab (shown below).
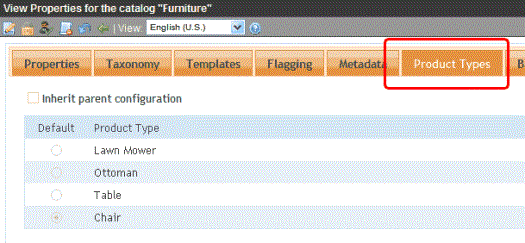
Then, when creating a new catalog entry, you first navigate to a catalog folder. Next, click New and choose a product type assigned to the folder (shown below).
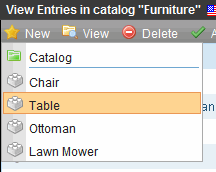
A product type determines the following aspects of the catalog entries based on it.
|
Catalog entry property |
For more information, see |
|
Product class |
|
|
Content page |
|
|
Attributes |
|
|
Media defaults (that is, size of thumbnail images added to a catalog entry) |
There are two steps to creating a product type.
Step 1: Properties, Attributes & Media Defaults
Step 2: Creating the Content Page
See Also: Deleting a Product Type
Step 1: Properties, Attributes & Media Defaults
To create a product type, go Workarea > Settings > Commerce > Catalog > Product Types > New > Product Type. Use the following table to complete the Add Product Type screens.
|
Tab/Field |
Description |
|
Properties Tab |
|
|
Title |
Give the product type a unique title. The title identifies this entry on the View Product Types screen.
Also, when creating a new catalog entry, users must pick a product type from the catalog’s New menu (shown below).
|
|
Description |
Enter a description for the product type. |
|
Class |
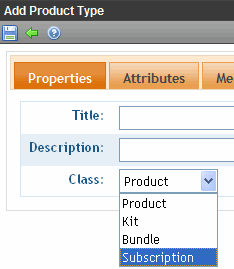
Enter a class for the product type. See Also: Product Classes |
|
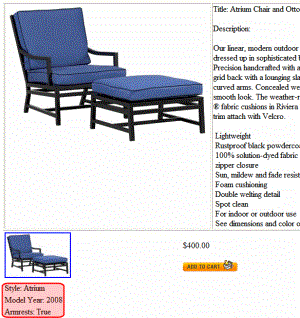
Define additional information about catalog entries based on this product type. By default, Attributes appear on the Product server control (illustrated below).
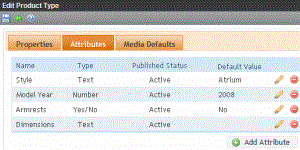
As another example, if the Product Type is for movies, attributes might be Actors, Running Time, Rating, Year Released, etc. Follow these steps to define a Product Type’s attributes. 1. Click the Product Type Attributes tab. 2. Click the Add Attribute button. 3. Assign a name to the attribute, such as color. 4. Choose from these data types. text date number boolean (yes or no) 5. Click OK. (continued in next row) |
|
|
Attributes Tab (continued) |
For example, you want an attribute that describes a chair’s dimensions. You create a text-based attribute for the Product Type you will use to add chairs to a catalog.
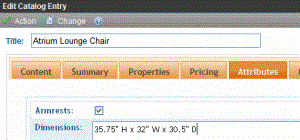
Then, whenever you add a new chair to the catalog, you enter its dimensions into the Attributes tab’s Dimensions field.
(continued in next row) |
|
Attributes Tab (continued) |
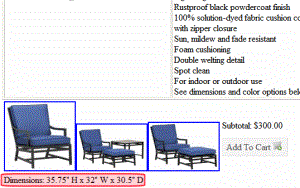
When a site visitor views the chair’s product page, he sees the attribute text below the thumbnails.
Attribute Statuses Note: You can delete an attribute only if it is not applied to a catalog entry. If you try to delete an attribute applied to a catalog entry, it is marked “Inactive.” Inactive attributes can no longer be assigned. Active - Attribute can be assigned to catalog entries Inactive - Attribute already assigned to one or more catalog entries, but can no longer be assigned. To make an attribute inactive, click the corresponding Mark for Delete ( Not Published - Attribute has been created but Product Type not saved yet Active - Marked for delete. Attribute will be deleted when Product Type is saved. |
|
If desired, enter sizes of thumbnail images. If you do, thumbnails are automatically generated for images (added on the Media tab) applied to catalog entries based on this product type. To add a new thumbnail size, click Add Thumbnail. To remove one, click the corresponding Remove ( To edit a thumbnail, click the corresponding Edit ( Viewing a Catalog Entry’s Thumbnails You can see a catalog entry’s thumbnails by clicking its Media tab, then View Thumbnails.
See Also: Product Server Control, thumbnails |
|
Creating a Kit
A kit is a type of catalog entry that allows a site visitor to select from free-text options, which can affect the item’s price. The options can also be placed into logical groups.
For example, if a catalog entry is a laptop computer, one group may let you enter options for RAM, another for operating system version, and a third could present hard drive options. This is illustrated below.
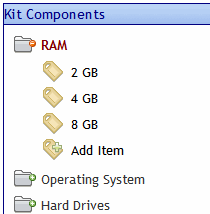
There is no limit to the number of groups you can add, nor the number of options in a group. All groups and options are simple text, created on a kit’s Items tab as needed, and can accommodate a price modifier. The example below shows how to set up chair color combinations.

In this example, the options do not affect the price. Here is how the options appear on a product page.
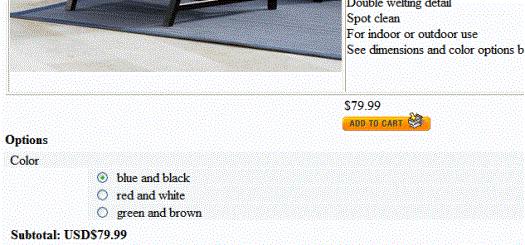
Consider another example in which the price does change. In this case, use the Item screen’s Price Modifier field to adjust price based on the chair frame. As shown below, if the chair frame is teak, the sale price increases by $25.00.
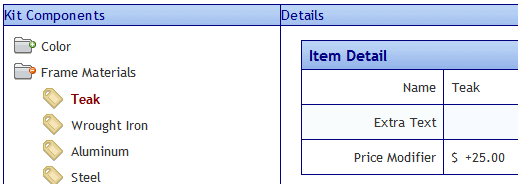
Other chair materials might adjust the price as shown below.
|
Frame material |
Price Modifier |
|
Wrought Iron |
$0.00 |
|
Aluminum |
+$15.00 |
|
Steel |
-$10.00 |
Note how the Price Modifier can either increase or decrease the sale price. Here are these options on the product page.
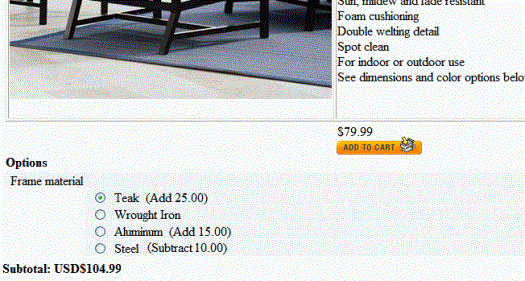
The chair’s base price is $79.99, and the teak frame increases it to $104.99.
Creating a Bundle
A bundle consists of several simple products. You would use it to combine several existing products into one “umbrella” catalog entry. That entry captures pricing, SKU number, shipping, and inventory information for the bundle. The information for the individual entries that make up the bundle are not affected when one is ordered.
As an example of a bundle using furniture, assume your eCommerce site sells a chair, a table, and an ottoman separately. You also sell them together as a set.
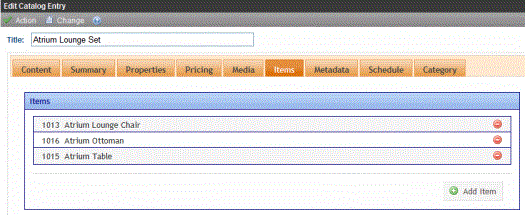
Use a bundle to define the set, add pictures, pricing, etc. On the bundle’s Items tab, you select the individual catalog entries that make up the bundle, as shown below.
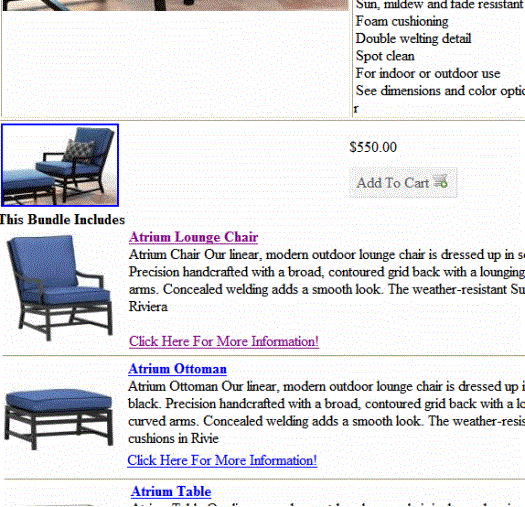
Here is how this bundle looks on a product page.
Creating a Complex Product
A Complex Product is similar to a bundle in that one catalog entry serves as an “umbrella” for other entries. However, unlike a bundle, a site visitor must select one of the catalog entries. So, the price is that of the selected entry, not the umbrella item.
The advantage of a Complex Product is its ability to consolidate several related items under one title, yet allow site visitors to choose the item they want. Because each item under the umbrella is its own catalog entry, it is priced and tracked separately.
For example, a site sells movies in three formats: VHS, DVD, and Blu-ray. Each is priced differently. To accommodate this, create catalog entries for the movie in each format, assigning images, SKU number, pricing, dimensions, etc. Then, create a Complex Product, make its title the title of the movie, and use the Items tab to select the catalog entries of the individual formats.
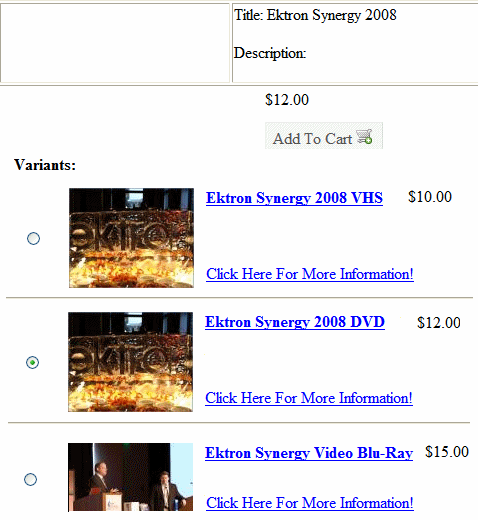
The Product List or Product Search control displays the Complex Product, which is the movie title. When a site visitor selects that, he sees the product page, which lists the format and price of each assigned catalog entry. He can only choose one. See example below.
Steps in Creating a Complex Product
Unlike the Kit or Bundle, a complex product does not have its own product class. Instead, you create a catalog entry whose product class is product, then assign other catalog entries to it via the Items tab. As soon as you assign one catalog entry via the Items tab, the original catalog entry is converted to a Complex Product.
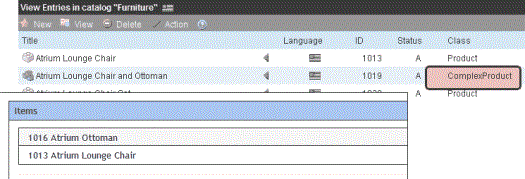
Note that the price of the “umbrella” product appears on the Product List and Product Search server controls. This can be misleading, since the price of individual items within the complex product can vary.
Note: You cannot apply tier pricing to a complex product. See Also: Tier Pricing
Creating a Subscription
A subscription is a good or service which
can be billed on a one-time or a recurring basis
places users who purchase it into a designated membership group, letting you grant them access to private content
Examples include
content only available to members who purchase a subscription
a gym membership
a book club, in which a customer makes the same payment and receives a different book each month
anti-virus software that expires after 12 months
a 3-year maintenance contract on a digital television, payable yearly
If you use the recurring billing feature, the bill can be generated for any number of months or years, but no other time increments. Each payment must be the same for the subscription’s term. The term begins when a customer submits the order.
Below is an example of a subscription-based product.
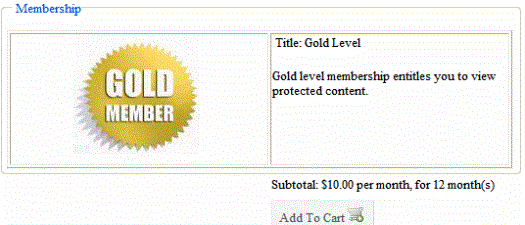
Note: Site visitors cannot apply a cart-level coupon to a subscription-based catalog entry. See Also: Creating a Coupon
Creating a Subscription Based Catalog Entry
Creating a subscription is the similar to creating a regular catalog entry. The table below lists everything you need to do, highlighting tasks that are unique to subscriptions.
|
Step |
For more information, see |
|
1. Create a subscription-based Product Type. On the Product Type screen’s Product Class dropdown, select Subscription (illustrated below).
|
|
|
2. Assign the Product Type to a catalog folder. |
|
|
3. In that folder, create a catalog entry for each subscription. |
|
|
4. On the Pricing tab, enter the cost. If using recurring billing, enter the term of the subscription. If this product does not use recurring billing, click No at the Use Recurring Billing dropdown. |
To learn about the Unit Pricing fields, see Entering a Catalog Entry’s Price Information Note: Subscription-based products do not support tier pricing. See Also: Tier Pricing To learn about Recurring Billing fields, see Entering Recurring Billing Information |
|
5. On the Items tab, assign membership and CMS user groups. |
|
|
6. If a subscription provides access to Ektron CMS400.NET content, use its folder Permission Table to grant permission to the membership and CMS user groups you defined in Step 5. |
Entering Recurring Billing Information
Important: Due to differences in the way payment gateways work, Ektron recommends testing recurring payments with your gateway before processing live transactions.
The Pricing tab’s Recurring Billing area of a subscription-based catalog entry (highlighted below) lets you determine if a subscription is billed on a one-time or a recurring basis. If recurring, it helps you define the terms.
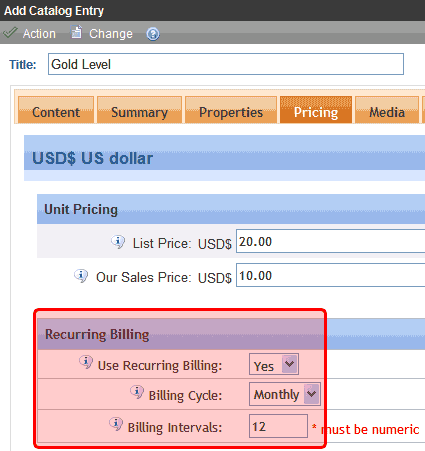
To set up recurring billing (that is, a series of scheduled payments), click Yes at the Use Recurring Billing dropdown. The recurring billing term begins when a customer submits an order, and is based on a number of months or years. You use the Billing Cycle dropdown to choose a time interval.
Next, enter a number of Billing Intervals for which a customer is charged. For example, if a customer should be charged once a month for 12 months, complete the screen as shown above. If a customer purchases the item on June 1, 2008, his credit card will be billed on these dates.
June 1, 2008 (purchase date)
July 1, 2008
August 1, 2008
September 1, 2008
October 1, 2008
November 1, 2008
December 1, 2008
January 1, 2009
February 1, 2009
March 1, 2009
April 1, 2009
May 1, 2009
As another example, if a customer should be charged once a year for 3 years, complete the screen as shown below.
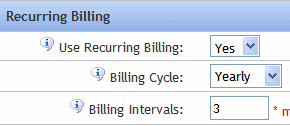
If a customer purchases the item on June 1, 2008, his credit card will be charged on the following dates.
June 1, 2008 (purchase date)
June 1, 2009
June 1, 2010
Assigning Groups to a Subscription-Based Catalog Entry
You must assign a membership user group to a subscription-based catalog entry. Optionally, you can assign an Ektron CMS400.NET user group. You assign groups via the subscription’s Items tab.
See Also: Membership User Groups; Managing User Groups
So, as part of setting up a subscription, you must either create new membership and (possibly user) groups, or use existing groups.
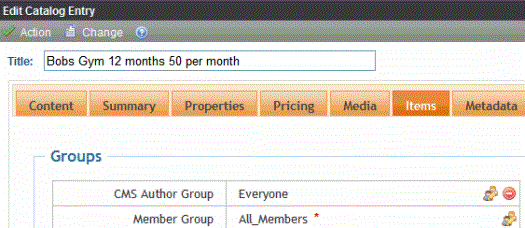
All users (identified by their email address) who purchase the product are automatically added to one of the groups.
Ektron CMS400.NET users are added to the group defined in the CMS Author Group field
Non-Ektron CMS400.NET users are added to the membership group defined at the Member Group field
Note: Ektron CMS400.NET checks a user’s email address to determine if he is a CMS or a membership user.
Subscriptions that do not Involve Ektron CMS400.NET Content
If a subscription does not involve access to Ektron CMS400.NET content, the membership group provides a list of customers who purchased the subscription. You can use the list to manage the accounts, notify them when the subscription is about to expire, etc.
Subscriptions that Involve Ektron CMS400.NET Content
If a subscription involves access to Ektron CMS400.NET content, create a folder and enable one or more subscription-based product types on its Product Type screen (illustrated below).

Place the subscription products in that folder. Site visitors shop for and purchase this content on your Web site as they do all products, via eCommerce server controls.
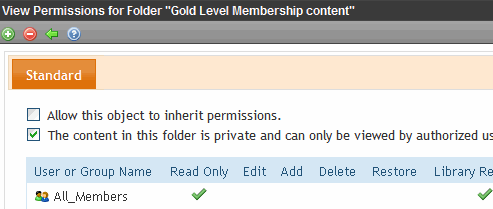
Then, create a regular content folder in which to create the confidential content. Next, use the content folder’s permission table to grant the subscription user groups access to that folder (illustrated below).
See Also: ”Folder Permissions” on page 5-56 and ”Assigning Permissions for Memberships” on page 16-22
Step 2: Creating the Content Page
After you complete and save the Add Product Type screen, a new screen allows you to enter XML Smart Form information. On this screen, you set up fields to collect information for the content page of catalog entries based on this product type. See example below.
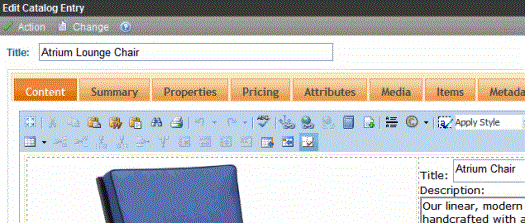
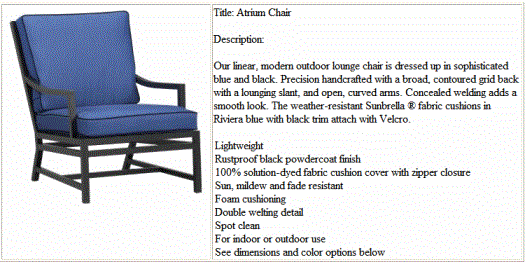
The content page appears on the Product server control, describing this catalog entry to site visitors. See example below.
The process of creating a product type content page is the same as creating an XML Smart Form, described in Before You Manage Smart Forms.
Editing a Product Type
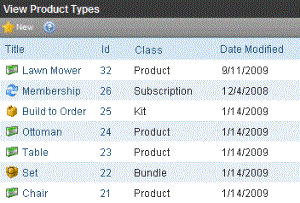
1. In the Ektron CMS400.NET Workarea, go to Settings > Commerce > Catalog > Product Types.
2. Click the product type that you want to edit.
3. See A product type determines the following aspects of the catalog entries based on it..
Note: You cannot edit a Product Type’s Class.
Deleting a Product Type
Prerequisite: The product type is not assigned to any catalog entries
1. In the Ektron CMS400.NET Workarea, go to Settings > Commerce > Catalog > Product Types.
2. Click a product type you want to delete.
3. Click Delete ( ).
).
4. A confirmation message appears.
5. Click OK.
Note: Although you cannot delete a product type that is being used, you can prevent users from creating new catalog entries based on it. To do this, go to each applicable folder’s Catalog Properties > Product Types screen and remove that product type.

 ).
). ). After making the edit, click Save (
 ).
).